Sunday, June 4, 2017
Alabama Traditional Cane Syrup-Maker Joe Todd
In this wonderful 20 minute video, old-timer Joe Todd shows how he carries on the syrup-making traditions of his father and grandfathers.
Joe and his wife run this small organic operation by themselves and put in a lot of hard days' work to keep the tradition going. He traces his family's syrup-making efforts back to at least 1835 and still has equipment that his grandparents used.
Joe reveals some cane-growing wisdom in the video. He says that cane should be planted in the ground in furrows in October. It will grow roots all winter and get an early start sending up shoots in the Spring, giving it a head start on the growing season.
Monday, March 13, 2017
How to Cook Bok Choy
Regine from AsianGarden2Table explains in detail the simplest way to prepare and cook Bok Choy using only oil and salt. Don't even try to cook Bok Choy at home until you've watched this video!
After you've mastered the simple method above, perhaps you will be ready to add a little flavor to the Bok Choy. In the video below, Regine cooks Bok Choy with peanut oil, red pepper, garlic, and salt. You can't watch this without wanting to try it!
You can purchase fresh Bok Choy at most grocery stores and at many farmer's markets. But it's really easy to grow your own Bok Choy, so you might want to give it a try.
How to Grow Bok Choy from Seeds
You've probably seen Bok Choy in the grocery store and in local farmer's markets, or maybe you've seen it on the menu in Asian restaurants. It has a unique taste and very juicy and crunchy stems and makes an excellent quick stir-fry. I like mine stir-fried in a little sesame oil.
Regine from AsianGarden2Table gives the very best tutorial on how to grow Bok Choy, beginning from seed planting to harvest. She packs a lot of information into this one video. After you watch it, you'll feel like an expert!
If you enjoyed Regine's video on how to grow Bok Choy, you'll also be amazed at her cooking skills as she shows how to harvest, prepare, and cook Bok Choy.
Sunday, March 12, 2017
Small Batch Homemade Sugar Cane Syrup the Modern Way
Here's a look at a modern method of making cane syrup at home. The main difference in this method from the old cane mills is the modern stainless steel sugar cane juicing machine.
Unlike the older way of crushing large quantities of cane in a cane mill, in this modern method all of the dirt is washed off the cane before juicing. This results in a cleaner product that requires less filtering.
This method is very doable for the home gardener with a large patch of cane. The juicing machine is not cheap, but if you like to drink fresh cane juice it may well be worth the investment. Also, it could be shared with other gardeners who also have an interest in juicing cane, whether for fresh juice or for syrup-making.
If you'd like to see how they did it in the old days, have a look at this video where some old Florida farmers show how they juice and cook about 60 gallons of cane juice into some fine syrup.
Making Cane Syrup the Old Florida Way
Here's a little culture along with your lesson on making sugar cane syrup the old-fashioned way, from the Florida Cracker Kitchen and Trading Company in Brooksville, Florida. There's quite a renewed interest in carrying on some old traditions, and syrup-making in the southern United States is making a comeback. Enjoy.
In the video they mention a "special law" in Florida that allows them to make and sell cane syrup using the old-fashioned methods without having to get all kinds of permits and inspections and all that. The law can be found in chapter 500 of the Florida Statutes and is referred to as the cottage food law.
If this looks like too much work, have a look at a more modern method for making cane syrup in smaller batches like you might grow in a home garden.
Sunday, March 5, 2017
Choosing the Best Wok for Stir-Fry Cooking
What material should a wok be made of for the best stir-fry results? You might be surprised. Regine from AsianGarden2Table.com offers some expert advice on how to choose a wok:
If you don't have time to watch the short video, her recommendation is to buy a cast-iron wok. For the details, watch the video!
Advantages of a cast-iron wok:
If you don't have time to watch the short video, her recommendation is to buy a cast-iron wok. For the details, watch the video!
Advantages of a cast-iron wok:
- Good conductor of heat;
- The more you use it the better it gets;
- May be a good source of iron in your diet;
- Performs well on electric and induction stove tops.
- Inexpensive;
- Very durable--can last several lifetimes.
Foxfire Memory: Soil Fertility
 |
| Appalachian Mountain Farm Photo credit: National Park Service |
Esco Pitts shared this memory in the Firefox 11 book of farming in Appalachia in the early 1900's:
" We didn't use any fertilizer in those days. The ground was fertile, and it grew good crops--produced well. It won't do it today. This old world is getting older, and erosion has taken off a lot of the good topsoil--put it down in the valley and washed it into the ocean. I don't know why it is, but it's that way. You can go into the mountains and clear up a brand-new ground--cut all the trees, dig up all the stumps, and plant stuff where nothing has ever been planted before--and it won't produce like it used to. We didn't have any insects back then. Nothing to bother anything. You didn't have to spray your apple trees. You didn't have to spray your beans or corn, nothing like that. It all grew and produced good, big, heavy crops."--Source: Foxfire 11, page 33.
It's hard to say whether this is really true, or just a case of "the older I get, the better life was..."
But it's nice to know that even people who worked hard every day just to eat still have fond memories of growing up on the farm, and are willing to share them with us.
Friday, February 24, 2017
Replace Pasta with Zucchini and Why People Started Locking Their Cars
J.C. Desclos, known as "thebossoftheswamp" on Youtube, always has some sage advice about life, well presented.
In the very enjoyable video below, he talks about how zucchini has replaced pasta in his diet and has improved his health, without reducing his enjoyment of his favorite foods. You may be surprised at what you can do with zucchini. I'm all in.
In the very enjoyable video below, he talks about how zucchini has replaced pasta in his diet and has improved his health, without reducing his enjoyment of his favorite foods. You may be surprised at what you can do with zucchini. I'm all in.
Indeterminate vs. Determinate Tomato Plants
Indeterminate tomato plants tend to make vines; determinate varieties tend to make bushes.
Indeterminate tomato plants tend to ripen their fruit a few at a time all during the growing season. Determinate tomatoes tend to ripen their fruit all at the same time, or nearly so.
In the video below, Marjory Wildcraft explains the difference and why it matters when you are deciding which type to grow.
Thursday, February 23, 2017
What is a Tomato Plant Sucker?
A tomato plant "sucker" is just a side branching stem on the tomato plant that is growing between a leaf and the main stem. They are usually removed on indeterminate-type tomato plants to direct more of the plant's energy to the main stem and the fruit.
In the video below, gardener Gary Pilarchik will show you in about one minute how to identify suckers on an indeterminate-type tomato plant.
In the video below, gardener Gary Pilarchik will show you in about one minute how to identify suckers on an indeterminate-type tomato plant.
Free Tomato Plants: How to Root Tomato Plant Suckers in Water
Gardener Gary Pilarchik quickly shows the simplest method for cloning tomato plants using plant suckers and a glass of water:
What is a tomato plant "sucker?"
Clone tomato plants using grow plugs.
Clone tomato plants using rockwool cubes.
What is a tomato plant "sucker?"
Clone tomato plants using grow plugs.
Clone tomato plants using rockwool cubes.
Free Tomato Plants: How to Root Tomato Suckers Using Rockwool Cubes
Rockwool cubes are similar to grow plugs and make rooting tomato plant suckers easy. Rooting suckers creates a "clone" of the mother plant.
In the video, Youtuber "Sleestaksrule" shows how he performs rooting magic with rockwool cubes. The procedure is the same whether you are growing in containers with soil, directly in the ground, or hydroponically.
How to root tomato suckers with grow plugs.
How to root tomato suckers in water.
What is a tomato plant sucker?
Free Tomato Plants: How to Root Tomato Plants from Suckers Using Grow Plugs
Yes, you can just stick the freshly cut suckers into a jar of water and they will form roots, but here's a more "foolproof" method from "mhpgardener," a very popular Youtuber:
What the heck is a tomato plant "sucker?"
See how to root tomato suckers in water.
See how to root tomato suckers using Rockwool Cubes.
What the heck is a tomato plant "sucker?"
See how to root tomato suckers in water.
See how to root tomato suckers using Rockwool Cubes.
Tuesday, February 21, 2017
Hi Tech Urban Commercial Vegetable Production Using Shipping Containers (Freight Farm)
The Tampa Bay Times has published an article about two IT professionals in St. Petersburg, Florida who have cleared a junk lot and installed shipping containers to create a high-tech computer monitored "freight farm." Brick Street Farms currently has three shipping containers growing kale, herbs, and lettuce which they sell to local restaurants, and to the public several days each week.
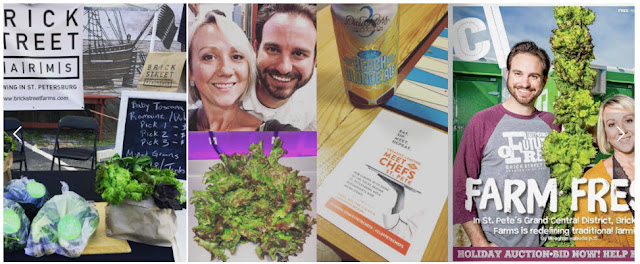
The vegetables are grown with vertical hydroponic towers under LED lighting. The containers are climate controlled. Water use is very low, but electricity use is relatively high, though daytime growing hours for the plants is at night since electricity costs are lower at night.
It's exciting to see people interested in growing local food and investing in the community. The downtown St. Petersburg area is currently under an aggressive "renaissance" (though some might use the term "gentrification") fueled by international tourism and wealthy retirees along with the businesses that serve them. This includes eating great food.
I look forward to seeing whether this will be a financially viable business model. It seems that these intensive high-tech operations have high overhead and must diligently manage costs.
Urban farmer Curtis Stone (a YouTube personality) revealed that selling to the restaurant industry can be perilous in his video about how to handle customers who don't pay. (link is to Youtube video).
And, Stone has some thoughts on the hydroponic shipping container method (in general, not specifically on Brick Street Farms):
From the Tampa Times article:
One of the founders of St Petersburg's Brick Street Farms acknowledges that what they are doing isn't really new from a tech perspective:
I wish them the best success.
CNN published a story in June 2015 that featured a freight farm touting their $15,000 per month income from selling container-grown hydroponics, but admitted their costs are so high (like Curtis Stone explained in the "appropriate technology" video above) that they are only breaking even:

The vegetables are grown with vertical hydroponic towers under LED lighting. The containers are climate controlled. Water use is very low, but electricity use is relatively high, though daytime growing hours for the plants is at night since electricity costs are lower at night.
It's exciting to see people interested in growing local food and investing in the community. The downtown St. Petersburg area is currently under an aggressive "renaissance" (though some might use the term "gentrification") fueled by international tourism and wealthy retirees along with the businesses that serve them. This includes eating great food.
I look forward to seeing whether this will be a financially viable business model. It seems that these intensive high-tech operations have high overhead and must diligently manage costs.
Urban farmer Curtis Stone (a YouTube personality) revealed that selling to the restaurant industry can be perilous in his video about how to handle customers who don't pay. (link is to Youtube video).
And, Stone has some thoughts on the hydroponic shipping container method (in general, not specifically on Brick Street Farms):
From the Tampa Times article:
The nation's largest indoor farm, FarmedHere, which opened in 2013 in an abandoned warehouse in Bedford Park, Ill., closed its 90,000-square-foot facility in January. While CEO Nate Laurell didn't say precisely what had gone awry, it is clear that growing large enough to offset equipment, energy and labor costs proved tricky.
One of the founders of St Petersburg's Brick Street Farms acknowledges that what they are doing isn't really new from a tech perspective:
Hydroponics aren't new, this technology isn't new and all the technology we used is 'off the shelf,' " said O'Malley, 35, who recently quit her job at Duke Energy to work the farm full-time.But Brick Street Farms must have a business model and cost-containment strategy they believe is financially viable.
I wish them the best success.
CNN published a story in June 2015 that featured a freight farm touting their $15,000 per month income from selling container-grown hydroponics, but admitted their costs are so high (like Curtis Stone explained in the "appropriate technology" video above) that they are only breaking even:
The operation brings in about $15,000 a month, and once he pays the loan, utilities, rent for the land, materials and salaries for himself and his wife, he's about breaking even. Profits should mount as he expands the wholesale business and opens a new retail store at Boston Public Market.As a home gardener, I think it is important to consider the feasibility of adopting technology to make gardening chores easier, reduce water and chemicals, and increase yields. We can all learn something from studying the successes and failures of the commercial growers.
Thursday, February 16, 2017
Varieties of Sugar Cane for the Garden: Purple, Yellow or Green
What is the difference between purple/red sugar cane, yellow sugar cane, and green sugar cane?
Sugar cane comes in many varieties, both heirloom and specially bred. For the backyard garden you are more likely to encounter heirloom varieties.
The purple cane is usually the softest for chewing. So if you want to chew the cane and suck out the juice, the purple cane is likely the best. For juicing I am told it can be too soft and tends to break off in the juicer.
Yellow and green canes are harder and hold up well in the juicer. These varieties are what the farmers grow to make table sugar.
Sugar cane can be juiced with the skin on or peeled. Leaving the skin on allows the juice to take on the color of the skin and gives it a richer taste. Personally, I prefer that the cane be juiced with the skin on, as long as it is well washed and scrubbed before juicing. In the video below, David, of TuboBiz shows the effects of juicing with the skin on, or peeled. He's located in the Phillipines.
Sugar cane comes in many varieties, both heirloom and specially bred. For the backyard garden you are more likely to encounter heirloom varieties.
The purple cane is usually the softest for chewing. So if you want to chew the cane and suck out the juice, the purple cane is likely the best. For juicing I am told it can be too soft and tends to break off in the juicer.
Yellow and green canes are harder and hold up well in the juicer. These varieties are what the farmers grow to make table sugar.
 |
| Purple sugar cane is usually the softest and is the easiest to peel and chew. |
 |
| Green cane is harder than purple cane and is more compatible with juicing machines. This cane started out green, but as it matured, it took on a more yellow color. |
 |
| This is yellow cane I grew from a cane purchased from a juice vendor. It was very sweet and the termites loved it! |
Sugar cane can be juiced with the skin on or peeled. Leaving the skin on allows the juice to take on the color of the skin and gives it a richer taste. Personally, I prefer that the cane be juiced with the skin on, as long as it is well washed and scrubbed before juicing. In the video below, David, of TuboBiz shows the effects of juicing with the skin on, or peeled. He's located in the Phillipines.
Wednesday, February 15, 2017
Success with Sugar Cane in a Self-Watering Container in Florida
Here are some progressive updates on the amazing progress of my red sugar cane growing in the self-watering containers. The cane grew so well I decided to leave it in the containers rather than transfer it to the ground.
Progress through 5 months: October 2014 through March 2015.
6 month sugar cane update.
7 month sugar cane update.
9 month sugar cane update.
10 month sugar cane update.
Progress through 5 months: October 2014 through March 2015.
6 month sugar cane update.
7 month sugar cane update.
9 month sugar cane update.
10 month sugar cane update.
How to Grow Sugar Cane in a Self-Watering Container
Sugar cane thrives in a self-watering container. However, it does tend to get top-heavy and once it gets larger it may require some type of support or it will blow over in a stiff wind.
I've grown cane in the ground and in the containers and I can tell you that in my area of central Florida the cane grows 10 times faster in the containers.
I do recommend that you hook up an automatic irrigation system of some type, because once the cane is three or four months old it will drink up all the water in half a day and you'll be out there watering all the time. And if you want to go out of town for a day or two, well...
Once the cane is mature and is harvested, the plant will send up more canes, but the soil will be exhausted and the plant will be completely root-bound. It's best to empty the container and start over with new canes, or break up the stump and salvage the best parts to re-plant. Personally, I lean toward starting over with new canes to reduce the chance for disease and pests to become established.
As far as fertilizer is concerned, you can use organic fertilizer or even worm castings. I think this would be preferable to the standard chemical fertilizer because it allows you to re-use the soil from year to year without a build-up of chemicals. If you are buying soil, it's not cheap. But, use what you've got.
It is important to use potting MIX, not potting soil, to get the proper wicking action.
Learn more about how the Earth Box works to make gardening easier.
How to Start Sugar Cane in Your Home Garden--Rooting the Cane
Sugar cane is a garden plant most suitable for the southern states, from California to Texas and the Gulf states. It can be grown further north, but does require a fairly long growing season to reach its full sweetness.
Sugar cane is suitable for growing in containers and does especially will in sub-irrigation planters, also known as self-watering containers. I also think it would do very well in large grow-bags.
Getting it started is simple. People often ask: can I grow sugar cane from seeds? The answer is yes, but that is not the preferred way. And I'm not sure where you'd find the seeds, except from a cane farmer, possibly. Cane grown from seeds would show considerable variability in sweetness, hardness, resistance to disease, and growing habits. This is why most gardeners propagate sugar cane vegetatively, like I'm showing here.
It's best to start with a freshly harvested cane. Cut the cane into two or three-foot lengths and stand the canes in a five gallon bucket about half-filled with water. Then wait. Depending on the weather you will see roots start to form within 3 to 7 days. Once a good mass of roots has formed, the cane can be planted in containers or directly into the garden. It must be kept moist and free from frost or freezing temperatures.
 |
| Sugar cane rooting in a bucket of water. |
 |
| Roots form around the joint between the sections of cane. You can see the bud swelling to grow a new cane. |
 |
| Some varieties of cane form roots more aggressively than others, like this green/yellow cane. |
 |
| This purple cane has started forming roots even before being harvested. This would make an excellent starter piece for rooting in water. Note the new canes growing from the ground. |
Sunday, February 5, 2017
How to Make Your Own Sauerkraut at Home
Real sauerkraut is cabbage that has fermented for several weeks in salty water. It is filled with probiotic bacteria that are essential for a health gut and a healthy immune system.
Do not confuse this raw fermented sauerkraut with the pickled sauerkraut you normally find in the grocery store. The pickled kind--with vinegar--does not have the valuable probiotics.
Grocery stores are now starting to carry the fermented type, but it is usually pasteurized, which kills many, if not all of the beneficial bacteria. Raw fermented sauerkraut can be expensive, especially if you eat it daily like I do. Making it yourself can greatly reduce this expense.
There are many variations on making sauerkraut. I recommend that you watch multiple videos and pick the method that works for you. I've picked out a couple of my favorite sauerkraut-making videos to get you started.
The first video is presented by Craig, a Canadian who is very knowledgeable about fermenting foods (especially beer). I think you'll enjoy it. It's a little over 20 minutes long.
The second video, below, is from the Cooperative Extension Service at the University of Alaska, Fairbanks. It is extremely detailed, if a bit dry, and also covers long-term storage of sauerkraut. Keep in mind that freezing or canning sauerkraut does kill the probiotic bacteria that is so essential to good health. The best way to have sauerkraut in your healthy diet is to make small batches that you can store in the fridge and eat within a couple of months.
A couple of tips from the videos:
- Use non-iodized sea salt. Avoid using regular table salt.
- Once the salt is added, avoid touching the kraut with any type of metal.
- Use a plastic or wooden bowl, not metal.
Tuesday, January 31, 2017
Build a Global Bucket Self-Watering Container Out of Two 5-Gallon Buckets
This "Global Bucket" system is probably the easiest and most durable self-watering container to build. They are also sometimes referred to as a "SIP" or Sub-Irrigation-Planter.
Everyone seems to build them a bit differently, but that's O.K. If it works and fits your budget, that's what counts.
In the video below, "budbackeast" explains his straight-forward method for building what he calls an Earth bucket. Note his use of the "net cup" to create a water-wicking feature.
All you need to get started on your self-watering bucket planter is:
Once you have the planting mix in the bucket, you can either use mulch, as he explains in the video, or you can just stretch black plastic or landscape fabric over the top and tie it to the bucket, then make a hole in the cover just big enough to install the plant.
There are various methods to fertilize the plant. You can use a 10-10-10 garden fertilizer by putting a cup of the fertilizer around the edges of the bucket. Or you can fertilize it weekly with some type of liquid fertilizer, or you can just use worm castings or worm tea. Experiment!
If you need a more detailed step-by-step explanation of the bucket construction, check out "Doc" Wilkey's video below. He uses a plastic cup instead of a net cup. Won't last as long, but it's cheaper.
Everyone seems to build them a bit differently, but that's O.K. If it works and fits your budget, that's what counts.
In the video below, "budbackeast" explains his straight-forward method for building what he calls an Earth bucket. Note his use of the "net cup" to create a water-wicking feature.
All you need to get started on your self-watering bucket planter is:
- 2 five-gallon buckets from your local home goods store. Or you can even get food-grade buckets for free from a bakery or restaurant if you don't mind asking.
- 1 piece of PVC irrigation pipe about 20 inches long, depending on the height of your buckets, to create the fill tube to be able to put water into your bucket.
- 1 3-inch net cup.
- 1 three-inch hole saw, to create the hole in the center of the top bucket to insert the net cup.
- 1 hole saw slightly larger than the PVC pipe diameter to create the hole in the top bucket to insert the PVC fill tube.
Once you have the planting mix in the bucket, you can either use mulch, as he explains in the video, or you can just stretch black plastic or landscape fabric over the top and tie it to the bucket, then make a hole in the cover just big enough to install the plant.
There are various methods to fertilize the plant. You can use a 10-10-10 garden fertilizer by putting a cup of the fertilizer around the edges of the bucket. Or you can fertilize it weekly with some type of liquid fertilizer, or you can just use worm castings or worm tea. Experiment!
If you need a more detailed step-by-step explanation of the bucket construction, check out "Doc" Wilkey's video below. He uses a plastic cup instead of a net cup. Won't last as long, but it's cheaper.
Sunday, January 29, 2017
Growing in an Earthbox® Self-Watering Container

The EarthBox® is a self-watering container that grows vegetables and herbs with incredibly little effort. Plants grown in an EarthBox® grow much faster and get much larger than plants grown in the ground. (EarthBox is a registered trademark of Novelty Manufacturing Co.).
Below, Graham from Kind Gardens explains what an EarthBox® is and how you set it up.
The EarthBox® was invented by a Manatee County farmer named Blake Whisenant. He's well into his 80's now but his family still runs the EarthBox Garden Center in Ellenton, Florida.
There are other companies that make self-watering containers that are similar to the EarthBox®. Some are less expensive, but they are not as durable as the EarthBox® brand, and don't have as many accessories available, like automatic watering systems.
You can also make your own self-watering containers for less money, but the durability and ready-to-plant ease of the EarthBox® can't be beat.
Advantages to using the EarthBox® include:
- EarthBox® gardening requires less fertilizer.
- Nutrients do not leach out of the EarthBox® into our waterways.
- EarthBox® gardening requires MUCH less water than a conventional garden.
- EarthBoxes® generally have fewer soil-borne diseases than a conventional garden.
- EarthBoxes® do not require weeding. Should I repeat that? That may be the only reason you need to switch to EarthBox® gardening.
- EarthBoxes® are made out of food-grade plastic, so harmful chemicals do not leach into your food.
- EarthBox® plastic does not deteriorate in the sun like other plastics. It is designed to last more than fifteen years. Commercial growers have proven the durability of the product over that period of time.
I garden exclusively in EarthBoxes®. Below are some photos of my garden.
 | |
| Swiss Chard (left), and Collards (right) growing in my EarthBoxes®. |
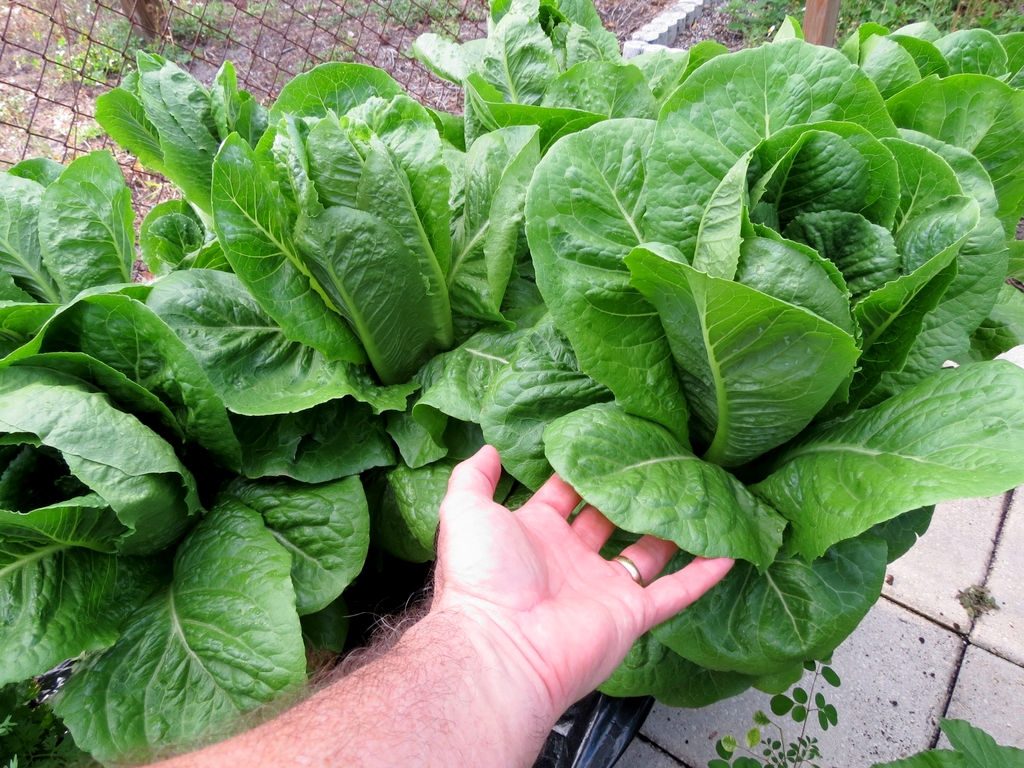 |
| A great crop of Romaine Lettuce growing in an EarthBox®. I grew six plants in one box. |
 |
| I even grow sugar cane in a self-watering container. This is not an actual EarthBox®, but is one of the copy-cat boxes. Not as strong, but it was cheaper. Won't last as long, but it got the job done. Wheels broke off prematurely. |
Saturday, January 28, 2017
How to Grow Broccoli with Big Flower Heads
In the video below, Regine Norman of AsianGarden2Table explains her secrets to growing fantastic broccoli.
Regine's videos are extremely detailed and well-produced and her knowledge is astounding.
Here's a secret from Regine: start with quality seeds from a respected supplier (avoid seeds from your local Home Depot). On her website, she sells seeds for the "Green King" variety of Broccoli.
Broccoli has a minimum of pest problems and continues to produce flower heads after the main harvest. I'll never forget the first broccoli I ever grew. The flavor and texture was so much better than what I was used to from the store. Below is a photo of me with my first broccoli harvest in about 1981.
 |
| My first broccoli harvest, 1981. |
Wednesday, January 25, 2017
Why "Cure" Sweet Potatoes After Harvesting?
Curing is an important step after harvesting sweet potatoes, even for the home gardener, for two reasons, as explained by Iowa State University Extension Vegetable Specialist Ajay Nair in this excellent video (my comments about the video below the video):
The video above discusses both grading and curing. While home gardeners are not particularly concerned with grading, I recommend watching the whole video just to learn. If you prefer to go right to the information about curing, you can skip ahead in the video to the 3:35 point.
Sweet potatoes sustain small injuries during the harvest process. These injuries provide openings for disease which leads to rot. To store sweet potatoes for several weeks or months, these injuries need to be healed. The sweet potatoes themselves will heal if placed in the correct environment for a couple of weeks.
Also, "curing" the sweet potatoes helps improve their flavor and sweetness.
To cure, place the sweet potatoes in a well-ventilated environment maintained at 85 to 90 degrees Fahrenheit and 80 percent humidity for about two weeks. They will cure at somewhat lower temperatures, but it will take longer.
Gardeners use various methods to create the right environment for curing.
After curing, the sweet potatoes should be kept in a cooler, drier (but not too dry) environment. Usually, 55 to 65 degrees is the temperature I see recommended most often.
I cure my sweet potatoes by putting them in a 5 gallon bucket and placing the lid on loosely. I put the bucket on the south side of the house on the porch with a concrete floor. Even during the cooler months the sun heats up the concrete floor and the bucket enough to cure the potatoes in a couple of weeks. I live in Florida, so this works well for me. In colder climates, even in the South, this may not work well and you'll have to try something different to keep them warm and moist.
The video above discusses both grading and curing. While home gardeners are not particularly concerned with grading, I recommend watching the whole video just to learn. If you prefer to go right to the information about curing, you can skip ahead in the video to the 3:35 point.
Sweet potatoes sustain small injuries during the harvest process. These injuries provide openings for disease which leads to rot. To store sweet potatoes for several weeks or months, these injuries need to be healed. The sweet potatoes themselves will heal if placed in the correct environment for a couple of weeks.
Also, "curing" the sweet potatoes helps improve their flavor and sweetness.
To cure, place the sweet potatoes in a well-ventilated environment maintained at 85 to 90 degrees Fahrenheit and 80 percent humidity for about two weeks. They will cure at somewhat lower temperatures, but it will take longer.
Gardeners use various methods to create the right environment for curing.
After curing, the sweet potatoes should be kept in a cooler, drier (but not too dry) environment. Usually, 55 to 65 degrees is the temperature I see recommended most often.
 |
| Curing sweet potatoes in a 5 gallon plastic bucket. |
Tuesday, January 24, 2017
Growing Sweet Potatoes in Containers
Sweet Potatoes grow fairly well in containers, though the best harvests seem to come from growing sweet potatoes in the ground or in mounds or raised beds. I believe the sweet potato plant senses the limits of the container and limits its own production.
Nevertheless, not everyone has space to grow a large garden and must grow in containers. The larger the container, the larger the potatoes will be. The container can be made of any material that will hold up without decomposing during the long growing season. Large pots, fabric bags, buckets, trash cans, and self-watering containers all make good containers for growing sweet potatoes.
A couple of tips:
I planted some sweet potatoes in a self-watering container and had pretty good results. This would work well on a patio or sunny balcony. You can see my harvest in the video below:
Nevertheless, not everyone has space to grow a large garden and must grow in containers. The larger the container, the larger the potatoes will be. The container can be made of any material that will hold up without decomposing during the long growing season. Large pots, fabric bags, buckets, trash cans, and self-watering containers all make good containers for growing sweet potatoes.
A couple of tips:
- If you are using fertilizer, use a low-nitrogen fertilizer. Too much nitrogen will result in excessive leaf growth at the expense of the potatoes.
- Use the largest container you can.
- Use a soft, sandy, well-drained soil. Sweet Potatoes need plenty of moisture, but they don't like to stay wet and soggy.
- If insects are a problem, mix diatomaceous earth into the soil. You can get it at most garden stores or big box stores.
- Sweet potatoes love plenty of sun and lots of hot weather.
I planted some sweet potatoes in a self-watering container and had pretty good results. This would work well on a patio or sunny balcony. You can see my harvest in the video below:
Thursday, January 19, 2017
How to Grow Sweet Potatoes, From Starting to Harvest
LDSprepper has an excellent video series on growing sweet potatoes. He harvested 139 pounds of beautifully formed sweet potatoes using the method he explains in the video playlist below which contains 8 videos. You can just let them play and the next one will start automatically after each one finishes:
The videos in the series are as follows (length in minutes of each video is indicated):
If you are a strict organic gardener, don't let that stop you from watching. There is still a lot to be learned if you are not an experienced gardener.
The videos in the series are as follows (length in minutes of each video is indicated):
- How to grow sweet potato slips: getting started. 3:34
- How to grow sweet potato slips: week 2, GMO and organic. 6:15
- How to grow sweet potato slips: week 4. 5:26
- How to grow sweet potato slips: week 6. 7:17
- How to grow sweet potato slips: week 8. 4:02
- Planting sweet potato slips. 11:06
- Amazing sweet potato harvest: 139 pounds from three potatoes. 7:01
- How to bake the perfect sweet potato recipe. 2:53
If you are a strict organic gardener, don't let that stop you from watching. There is still a lot to be learned if you are not an experienced gardener.
Biggest Sweet Potato Harvest You'll Ever See
LDSprepper harvests his sweet potato garden on November 30, right after a light frost:
His secret to a HUGE harvest:
Raised bed.
Soil mixture contains 75% sawdust plus 25% coarse sand.
Fertilized weekly with Mittleider weekly feed mineral fertilizer.
LDSprepper has an entire video series on how to grow sweet potatoes, from starting the slips to cooking your harvest.
His secret to a HUGE harvest:
Raised bed.
Soil mixture contains 75% sawdust plus 25% coarse sand.
Fertilized weekly with Mittleider weekly feed mineral fertilizer.
LDSprepper has an entire video series on how to grow sweet potatoes, from starting the slips to cooking your harvest.
Sweet Potato Tower
YouTuber "A Day Late" gardener in Virginia shares his experience growing sweet potatoes in a homemade vertical tower. I think his 35 pound harvest of sweet potatoes is excellent!
His comments about the vertical tower:
"Overall the work and maintenance to grow this was rather low. Most of the work was in setting it up and shoveling in the dirt. Harvesting was a breeze and was literally just unwrapping the fencing and pushing the dirt over to remove the potatoes."
His advice for "curing" the sweet potatoes:
"When digging your potatoes you need to be careful with the tubers. Be gentle and take care not to bruise or rip the delicate outer skin. Lightly brush off clumps of dirt and lay out in the sunlight for a day. It's ok to have some dirt on the tuber, and this little bit of dirt will dry up. Sweet potatoes need to cure before you store or prepare them to eat. It's recommended to place them in a dry dark area at about 85 degrees (F) for 10 days. Then after that store them in a dark cool place."
I grew sweet potatoes in a raised bed, but was slightly disappointed in the results because I didn't make it deep enough. As you can see from the tower constructed by "A Day Late" the sweet potatoes used up every bit of the tower. I'm going to try this method.
While he doesn't giver step-by-step instructions on how to construct it, most anyone can reverse engineer it by watching him take it apart.
Wednesday, January 18, 2017
Growing Sweet Potatoes in Wood Chips
Sweet potatoes can be grown in the ground or in containers. Containers can be limiting, and in some areas the ground may be too hard, too dry, or too wet. Growing sweet potatoes in wood chips may be a viable alternative. It sure is a lot easier to harvest from wood chips than from the ground.
In this Nat Geo video, Tony, an Appalachian agriculturalist, shows us how he grows sweet potatoes in wood chips on his property:
As an example of harvesting a bounty of sweet potatoes 90 days after planting in wood chips, this couple in Virginia published this video from their one acre garden:
At 0:30 in the video they question the green coloration on one of the exposed sweet potatoes and wonder if it is poisonous like green-skinned regular potatoes. The short answer is no.
Regular potatoes are in the nightshade family and produce something called solanine, which can be toxic if you eat enough. Potatoes grown under the wrong conditions or stored improperly can produce toxic levels of solanine.
Sweet Potatoes are in the morning glory family and do not produce solanine.
Mother Earth News has a great article about potatoes and solanine.
The LA Times asks an expert about green-skinned sweet potatoes.
Sunday, January 15, 2017
What are Sweet Potato Slips?
Getting sweet potatoes started in your garden, whether you are planting in the ground or growing your sweet potatoes in containers, involves planting "slips" which are like cuttings.
A sweet potato slip is a piece of sweet potato vine stem with roots and leaves. Sweet potatoes are not grown from seed, but are vegetatively produced.
The easiest way to make your own slips is to go to the market or grocery store and buy some organic sweet potatoes. You need to buy organic because the non-organic sweet potatoes are treated with a chemical to prevent sprouts from forming.
Below is a photo of some small organic sweet potatoes I bought from Publix supermarket. There were several varieties in one package. I left them alone for a week or so and you can see that the sprouts are already starting to form.

Another way to get slips is to take some cuttings from a sweet potato vine and place them in water. The hotter the weather, the faster they will root. In the photo below, I placed some cuttings into a vase with water.

The weather was quite warm, so the cuttings produced roots in about 2 days (photo below). I left them in the vase until the cutting formed a lot of roots, which took about 10 days or so.

After one of my harvests, I had a lot of sweet potatoes that were too small to clean and cook, so I just left them in a pile in the yard until I decided what to do with them. It was late summer and we were getting daily rains, so they quickly sent up sprouts (photo below), which could be harvested as slips to plant.

As you can see, there are several ways to produce sweet potato slips.
In the video below, gardener Wendi Phan explains how she grows sweet potato slips.
If you don't want to bother with growing slips yourself, you can buy them online during the springtime and early summer.
You may also be able to find rooted sweet potato slips, like the ones in the photo below, at your local garden center.
A sweet potato slip is a piece of sweet potato vine stem with roots and leaves. Sweet potatoes are not grown from seed, but are vegetatively produced.
The easiest way to make your own slips is to go to the market or grocery store and buy some organic sweet potatoes. You need to buy organic because the non-organic sweet potatoes are treated with a chemical to prevent sprouts from forming.
Below is a photo of some small organic sweet potatoes I bought from Publix supermarket. There were several varieties in one package. I left them alone for a week or so and you can see that the sprouts are already starting to form.

 |
| Close-up of a new "slip" forming on an organic sweet potato. |
Another way to get slips is to take some cuttings from a sweet potato vine and place them in water. The hotter the weather, the faster they will root. In the photo below, I placed some cuttings into a vase with water.

The weather was quite warm, so the cuttings produced roots in about 2 days (photo below). I left them in the vase until the cutting formed a lot of roots, which took about 10 days or so.

After one of my harvests, I had a lot of sweet potatoes that were too small to clean and cook, so I just left them in a pile in the yard until I decided what to do with them. It was late summer and we were getting daily rains, so they quickly sent up sprouts (photo below), which could be harvested as slips to plant.

As you can see, there are several ways to produce sweet potato slips.
In the video below, gardener Wendi Phan explains how she grows sweet potato slips.
If you don't want to bother with growing slips yourself, you can buy them online during the springtime and early summer.
You may also be able to find rooted sweet potato slips, like the ones in the photo below, at your local garden center.
 |
| Sweet potato plants from Home Depot garden center. Variety: Beauregard. |
Growing Sweet Potatoes: Getting Them Started
Sweet potatoes are a warm weather crop started from "slips," which are also called "draws." Of course you can purchase sweet potato plants that are ready to set out in the garden or in a container as soon as danger of frost is over.
The best sweet potato production comes from allowing a sweet potato to produce leafy sprouts, then breaking off the sprouts once they reach a certain size, then planting those sprouts, which are then called "slips" or "draws" into the ground.
In the two videos below, Danny, from Deep South Homestead, explains in a relaxing southern accent how he has success with sweet potatoes on his homestead. The videos are slow-paced, but are absolutely full of sweet potato wisdom and experience.
In this first video, Danny shows how to plant out "seed potatoes" that will produce "slips" or "draws."
In this second video, Danny explains how to harvest the slips and set them out into the garden for the best chance of success.
Subscribe to:
Posts (Atom)